> ## Documentation Index
> Fetch the complete documentation index at: https://docs.withgale.com/llms.txt
> Use this file to discover all available pages before exploring further.
# Account Setup
> Sign in to your Gale dashboard, complete verification, and generate the API key your integration needs.
This guide walks you through everything you need to do after you receive your Gale dashboard invitation — signing in for the first time, submitting your business details for Payment onboarding, and generating the API key that connects your store to Gale.
Your merchant account has **already been created for you**. You do not need to sign up. Use the sign-in flow with the email address that received the invitation.
## Before you begin
Have the following ready. You'll need all of it to complete verification in one sitting.
| What you need | Details |
| ------------------------------- | -------------------------------------------------------------------- |
| **Invitation email** | Contains your dashboard link. Sent to your business email address. |
| **Legal business name** | Exactly as registered with the state or IRS. |
| **Organization type** | For example, Private Company. |
| **EIN** | Your 9-digit Employer Identification Number, formatted `XX-XXXXXXX`. |
| **Registered business address** | The address where your business is legally based. |
| **Statement descriptor** | 6–22 characters. What shoppers see on their bank statement. |
| **Business website and phone** | A live URL and a 10-digit US phone number. |
The details you submit are shared with our verification provider.
***
## Step 1: Sign in to your dashboard
Open the dashboard link from your invitation email. You'll land on the Gale sign-in page.
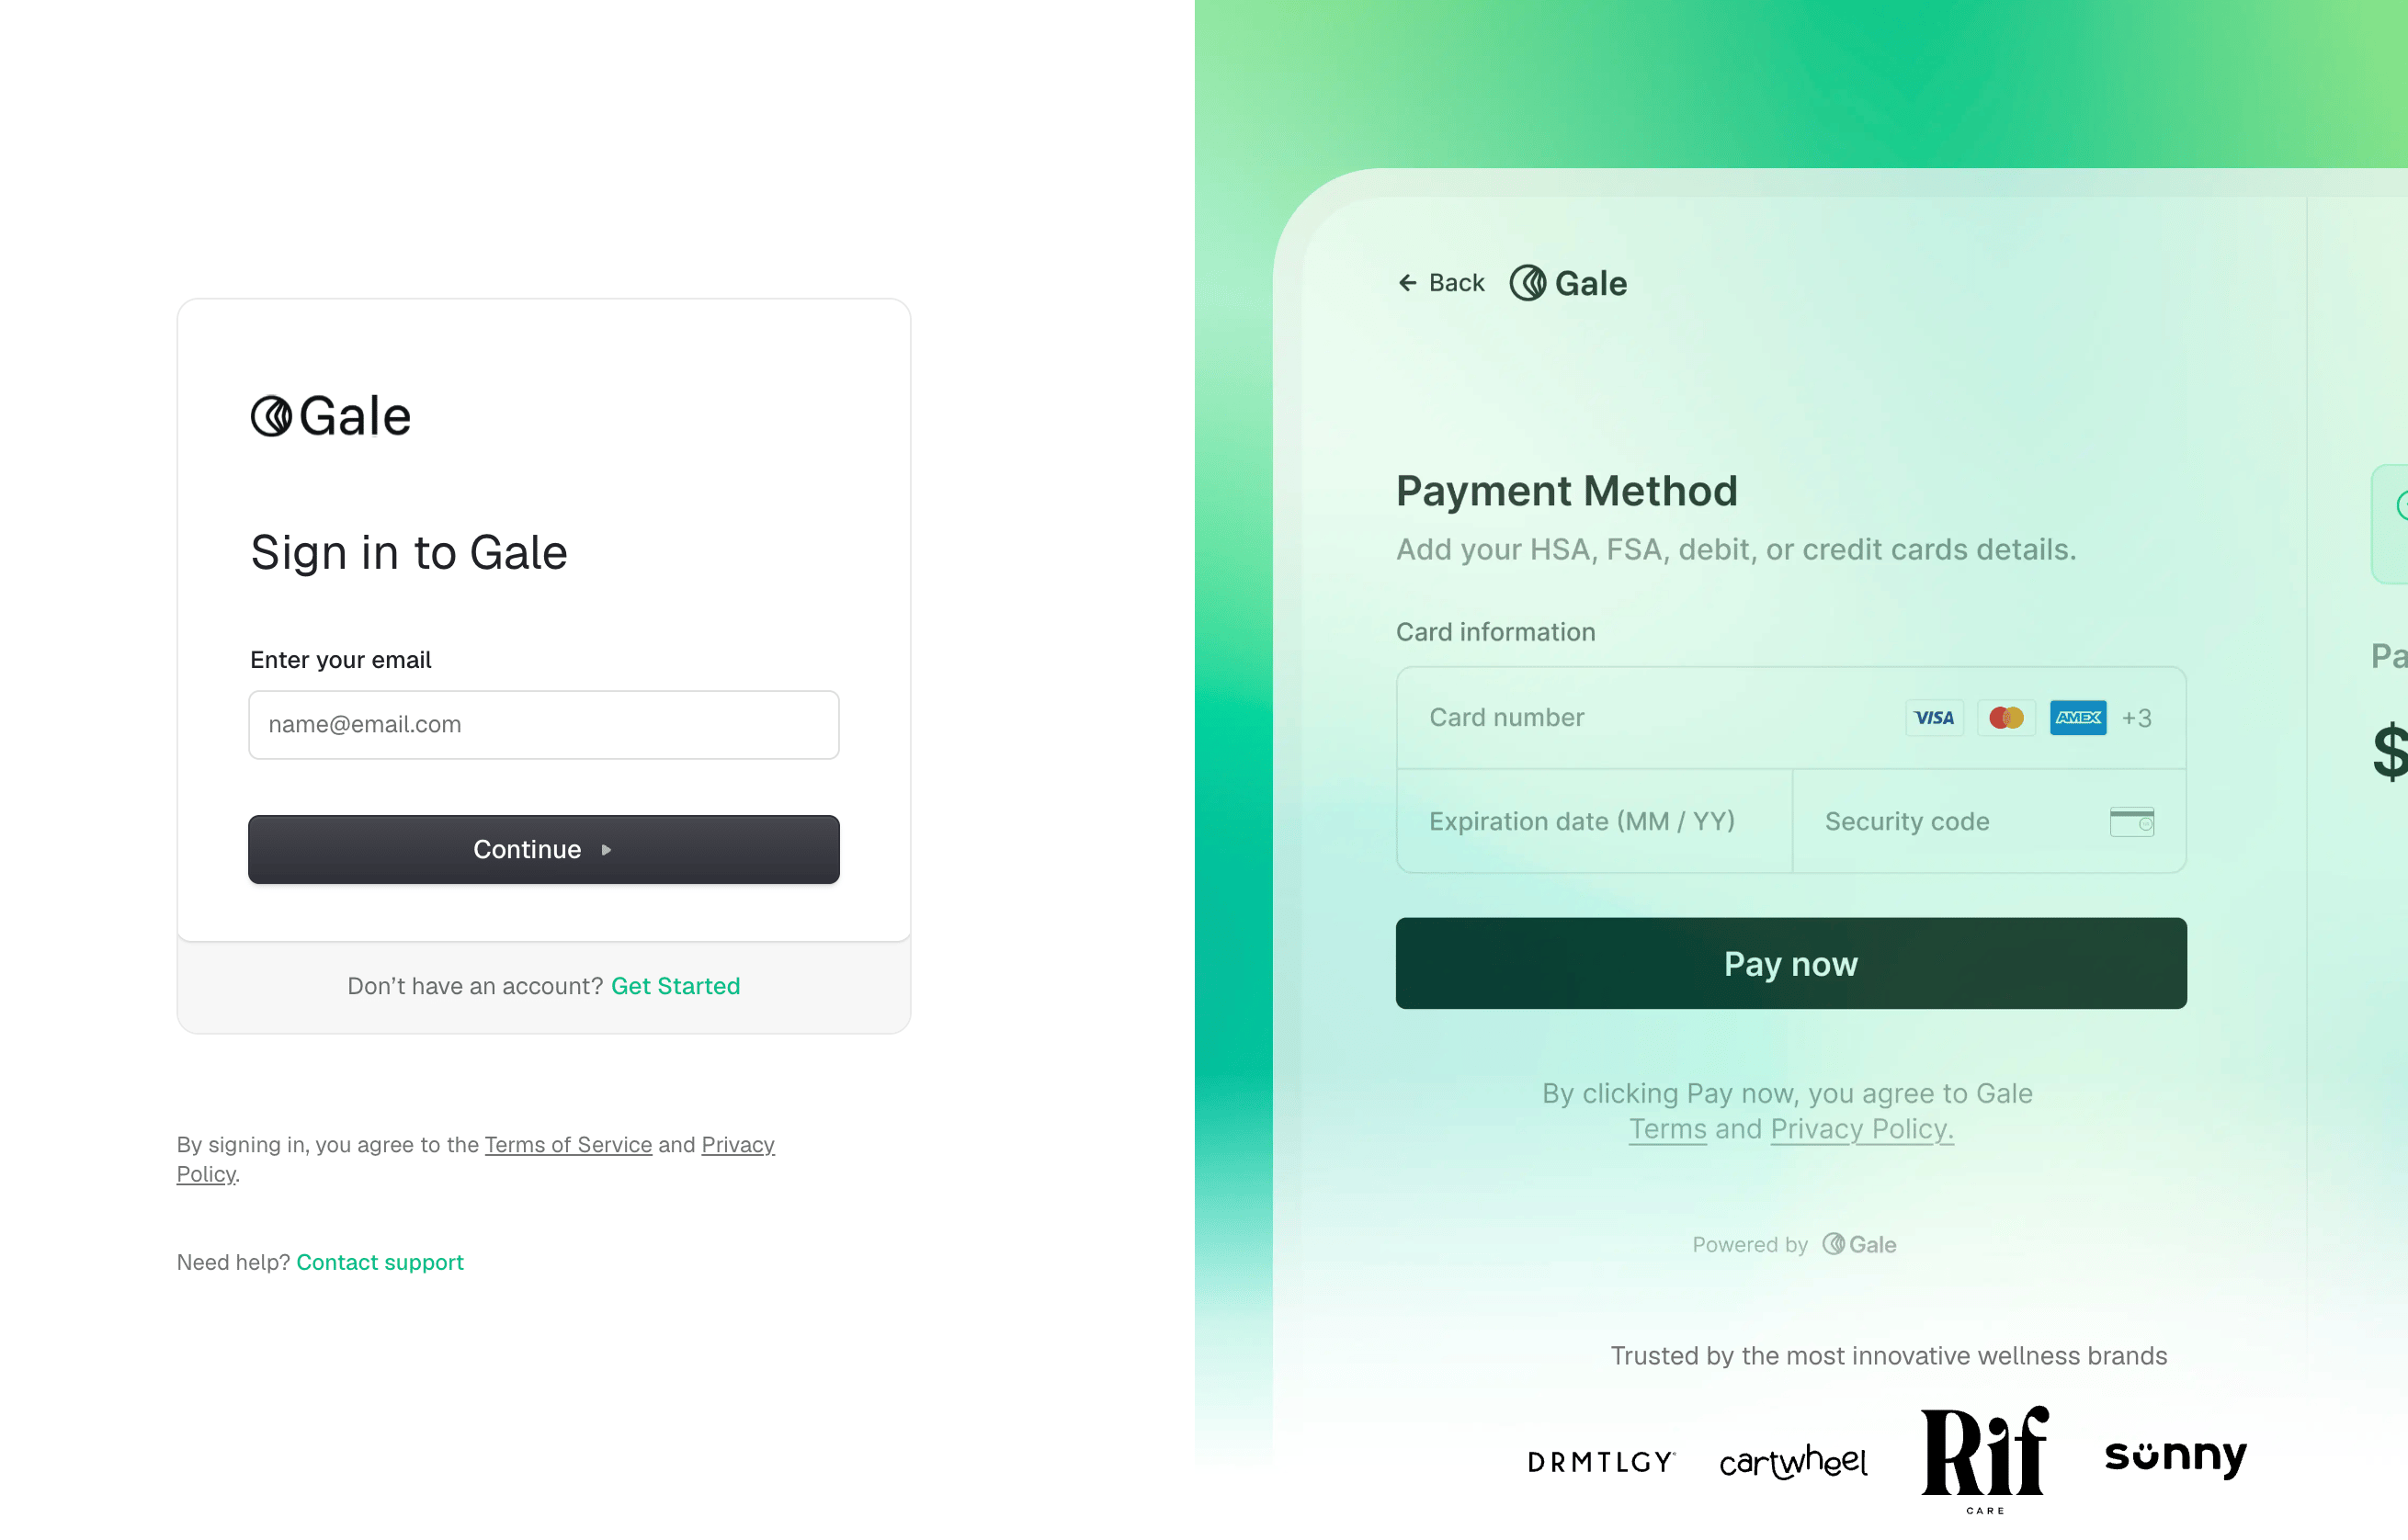 In the **Enter your email** field, type the email address your invitation was sent to. This address is already linked to your merchant account.
Choose **Continue**. We'll send a magic link to that inbox.
Open the email from Gale and follow the link to finish signing in.
**Do not select "Get Started."** That link creates a brand-new account. Your merchant account already exists, and signing up separately will create a duplicate that is not connected to your invitation.
Check your spam and promotions folders first. If it still hasn't arrived after a few minutes, confirm you entered the exact address the invitation was sent to — an alias or a personal address won't match. Still stuck? Select **Contact support** at the bottom of the sign-in page.
***
## Step 2: Turn off test mode
After signing in you'll land on the **Dashboard → Overview** page.
In the **Enter your email** field, type the email address your invitation was sent to. This address is already linked to your merchant account.
Choose **Continue**. We'll send a magic link to that inbox.
Open the email from Gale and follow the link to finish signing in.
**Do not select "Get Started."** That link creates a brand-new account. Your merchant account already exists, and signing up separately will create a duplicate that is not connected to your invitation.
Check your spam and promotions folders first. If it still hasn't arrived after a few minutes, confirm you entered the exact address the invitation was sent to — an alias or a personal address won't match. Still stuck? Select **Contact support** at the bottom of the sign-in page.
***
## Step 2: Turn off test mode
After signing in you'll land on the **Dashboard → Overview** page.
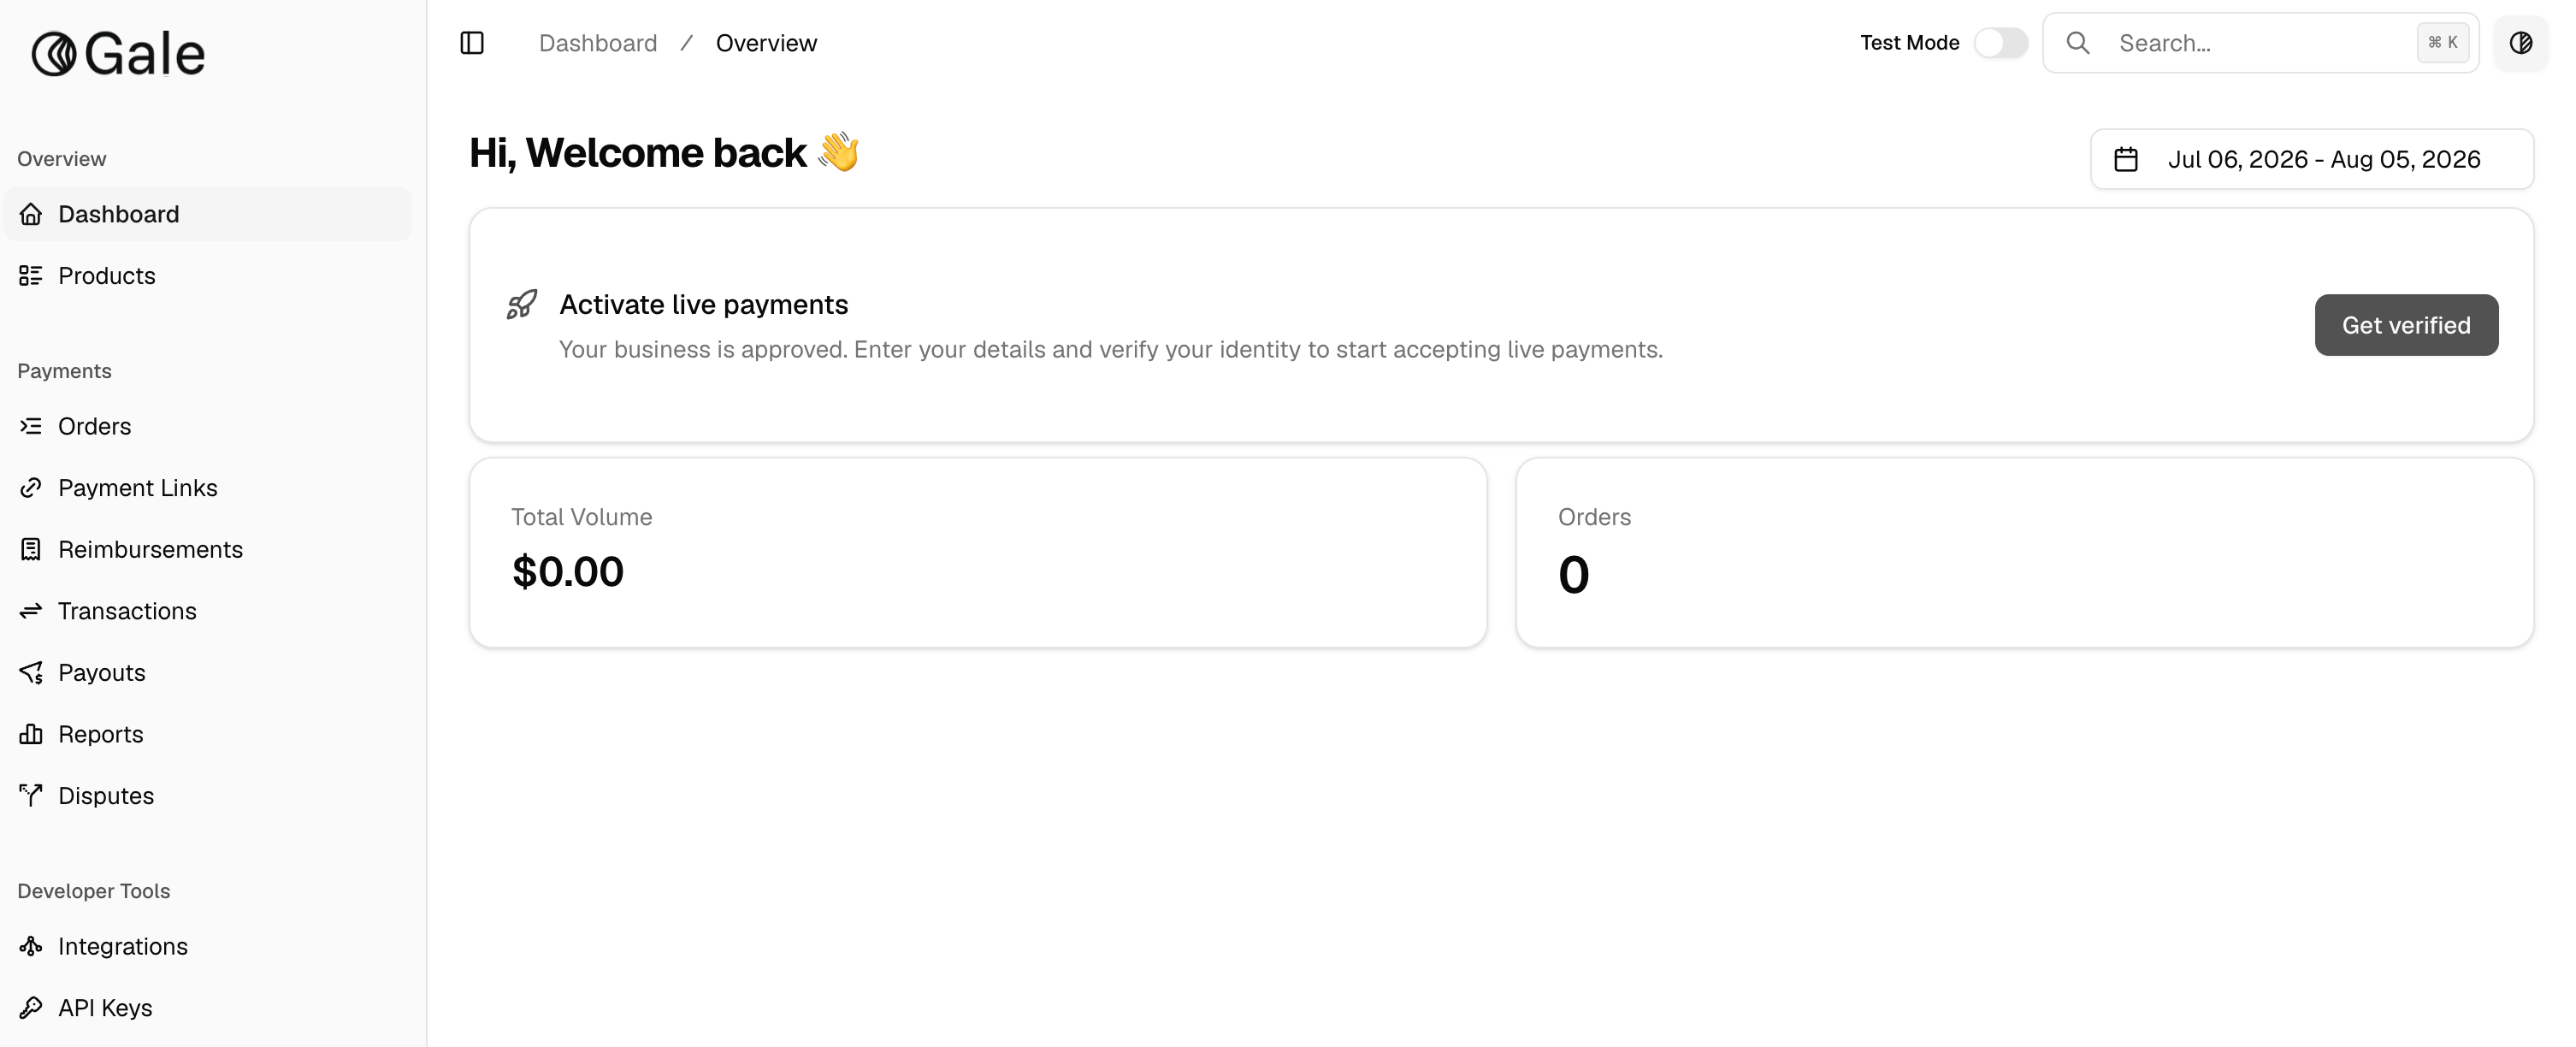 Find the **Test Mode** toggle in the top bar, to the left of the search field. If it's still switched on, select it to turn it off.
Test mode is off when the toggle appears grey and unfilled. If it's already off, skip ahead to the next step.
Test mode data — test orders, test transactions, and test payouts — is kept separate from live data. Switching modes never deletes anything; you can toggle back to test mode at any time to keep experimenting.
***
## Step 3: Start verification
With test mode off, the **Activate live payments** banner appears on the Overview page if verification is still outstanding.
Select **Get verified** on the right side of the banner.
No banner on your Overview page? That means verification is already complete or in review — nothing further is needed from you right now.
***
## Step 4: Complete the verification form
### Step 1 of 4 — About your business
Tell us how your business is legally registered.
Find the **Test Mode** toggle in the top bar, to the left of the search field. If it's still switched on, select it to turn it off.
Test mode is off when the toggle appears grey and unfilled. If it's already off, skip ahead to the next step.
Test mode data — test orders, test transactions, and test payouts — is kept separate from live data. Switching modes never deletes anything; you can toggle back to test mode at any time to keep experimenting.
***
## Step 3: Start verification
With test mode off, the **Activate live payments** banner appears on the Overview page if verification is still outstanding.
Select **Get verified** on the right side of the banner.
No banner on your Overview page? That means verification is already complete or in review — nothing further is needed from you right now.
***
## Step 4: Complete the verification form
### Step 1 of 4 — About your business
Tell us how your business is legally registered.
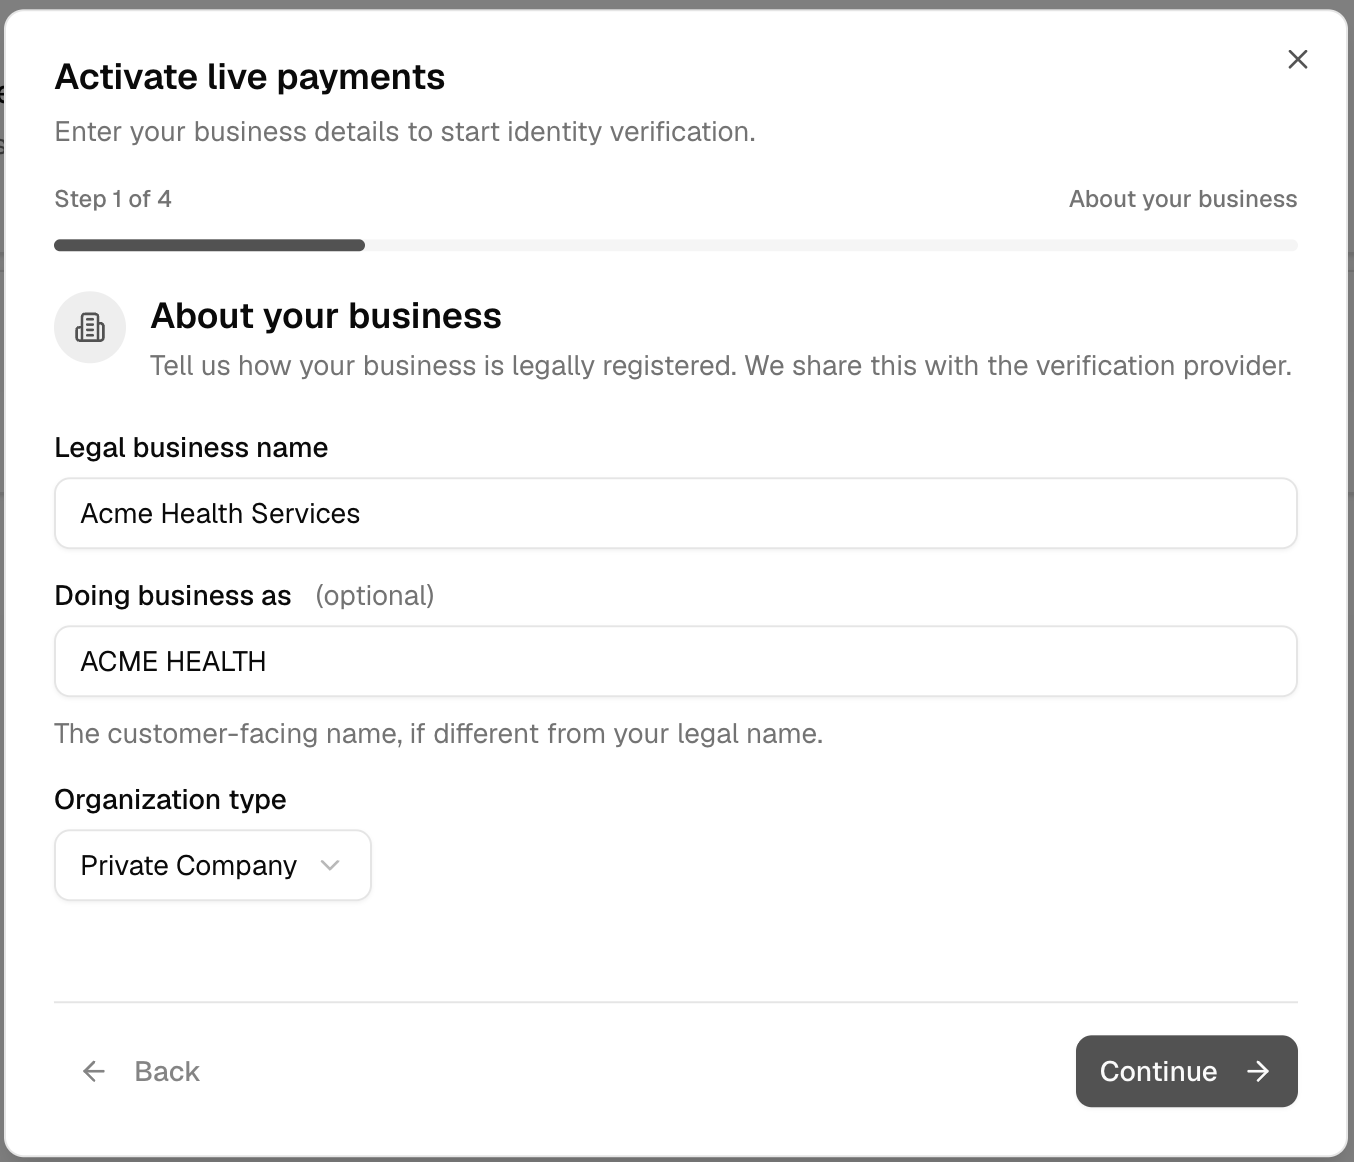 Click **Continue**.
### Step 2 of 4 — Tax ID and registered address
Tell us where your business is legally based.
Click **Continue**.
### Step 2 of 4 — Tax ID and registered address
Tell us where your business is legally based.
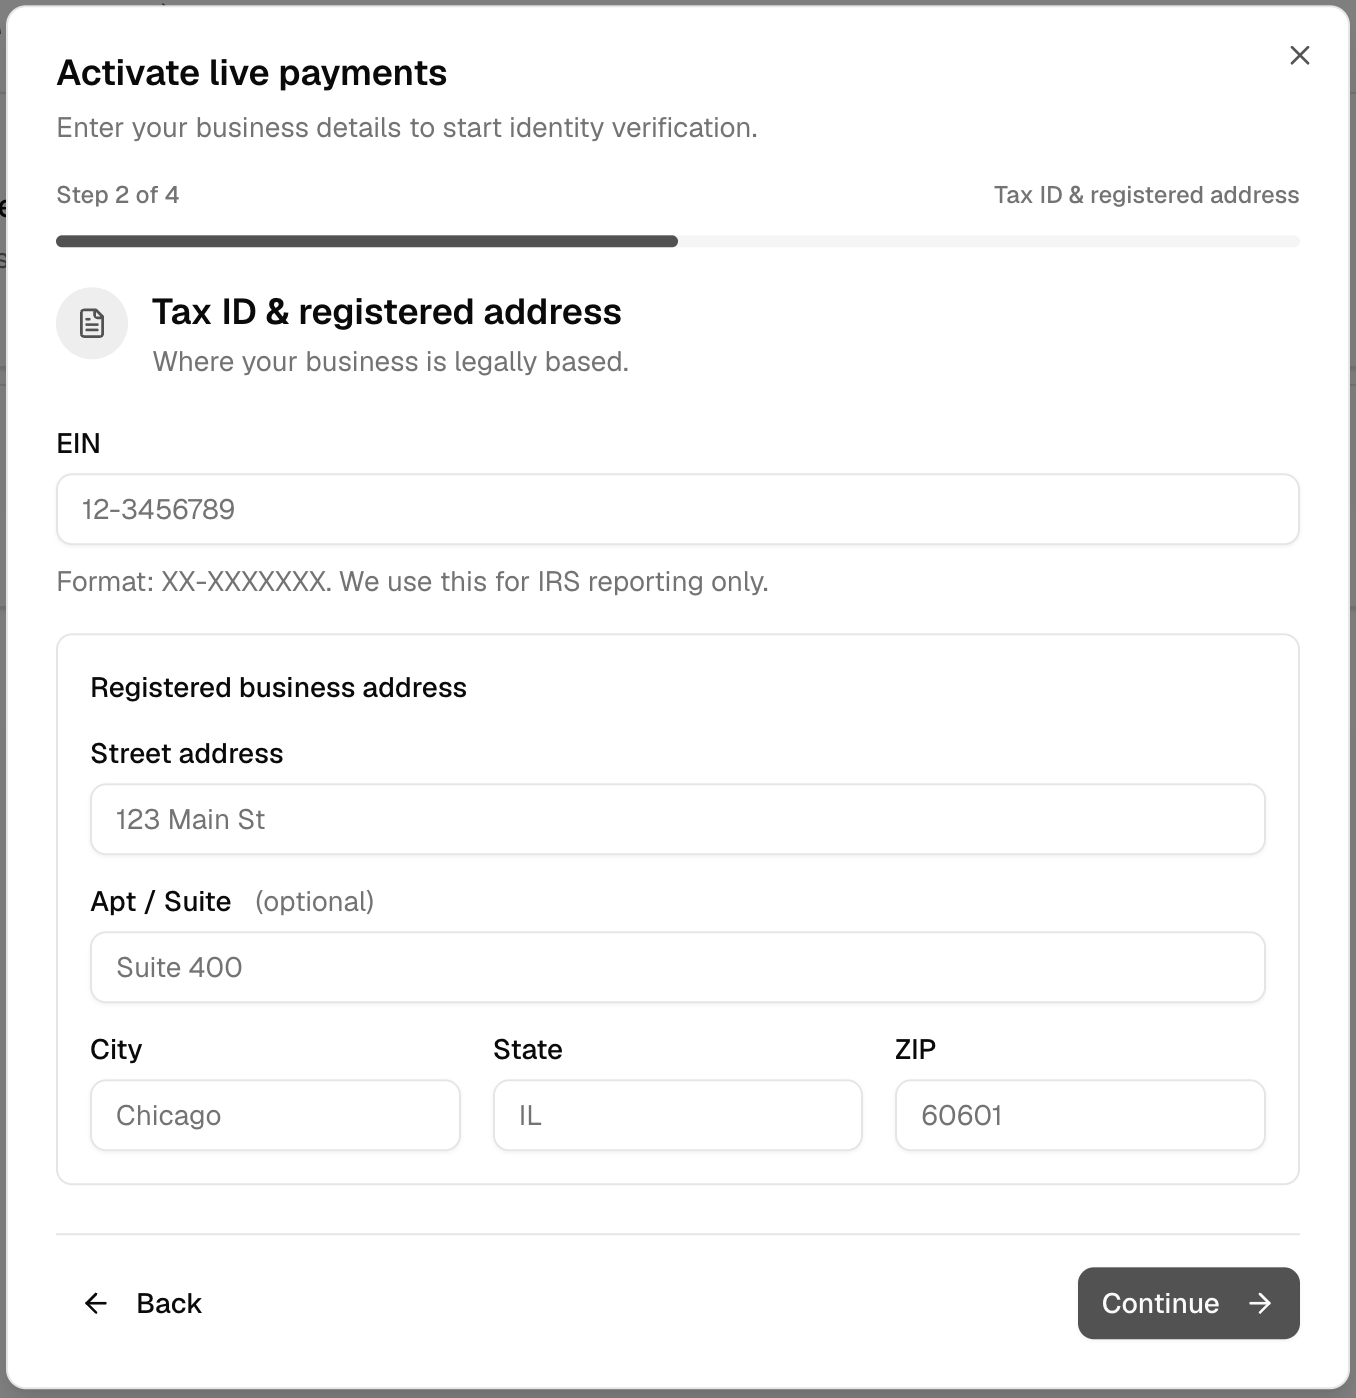 Click **Continue**.
### Step 3 of 4 — How customers see you
This determines what appears to shoppers on their bank statements and how they can reach you.
Click **Continue**.
### Step 3 of 4 — How customers see you
This determines what appears to shoppers on their bank statements and how they can reach you.
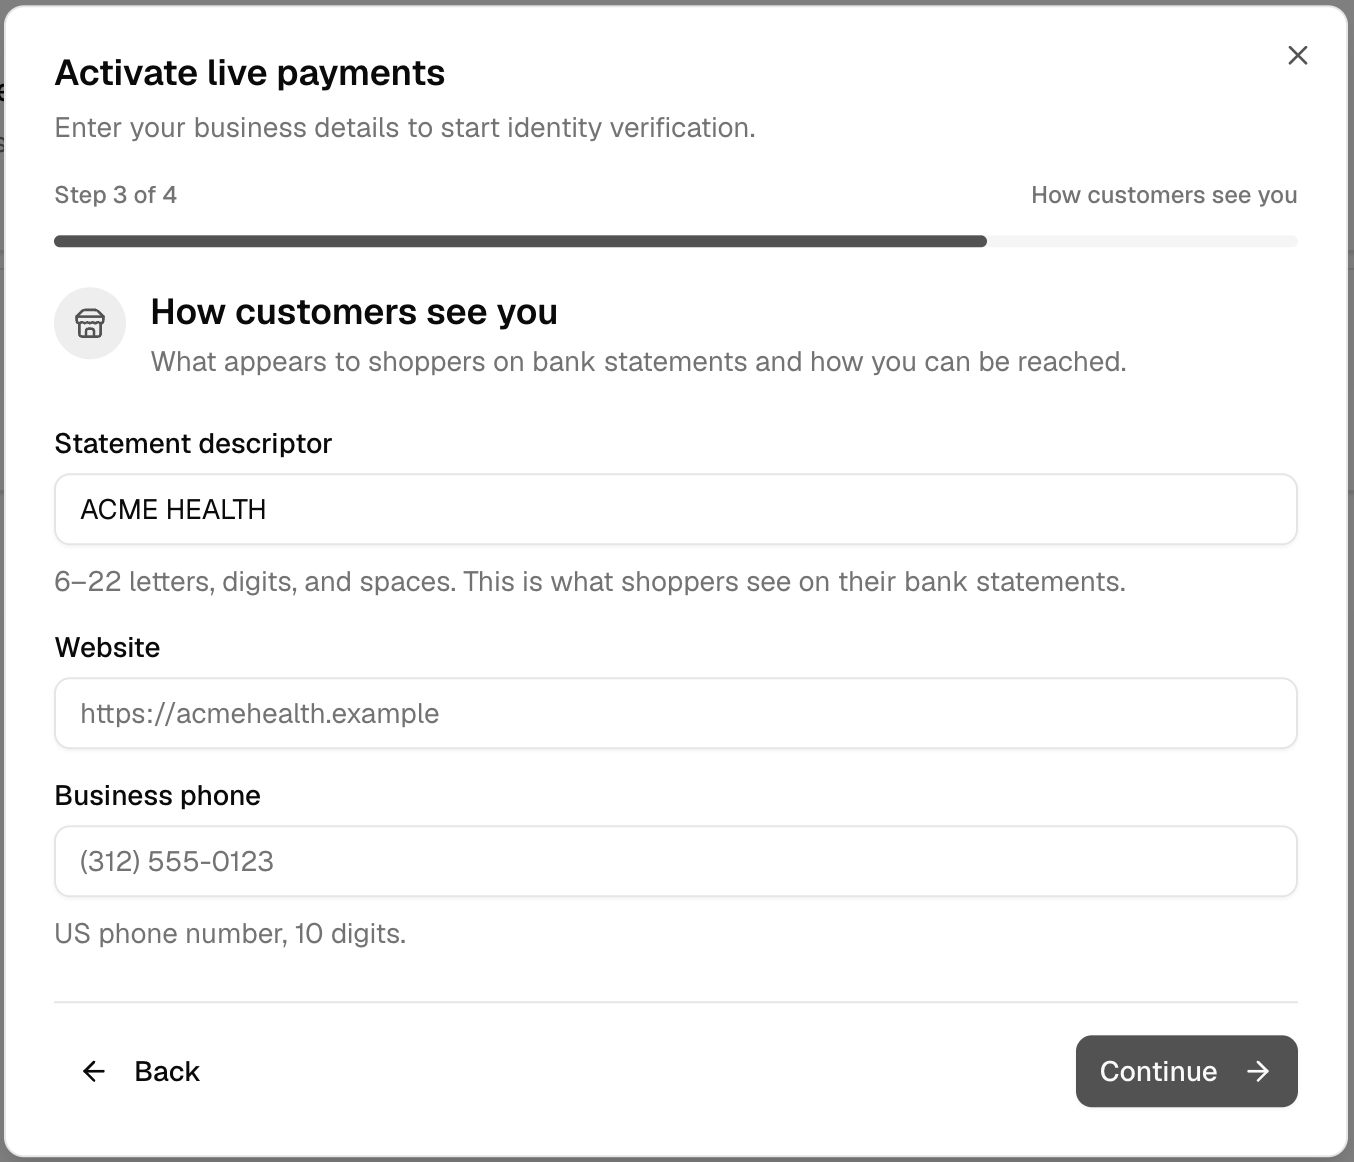 Click **Continue**.
Pick a statement descriptor customers will instantly recognize — usually your trade name.
### Step 4 of 4 — Review and submit
Confirm everything before submitting.
Click **Continue**.
Pick a statement descriptor customers will instantly recognize — usually your trade name.
### Step 4 of 4 — Review and submit
Confirm everything before submitting.
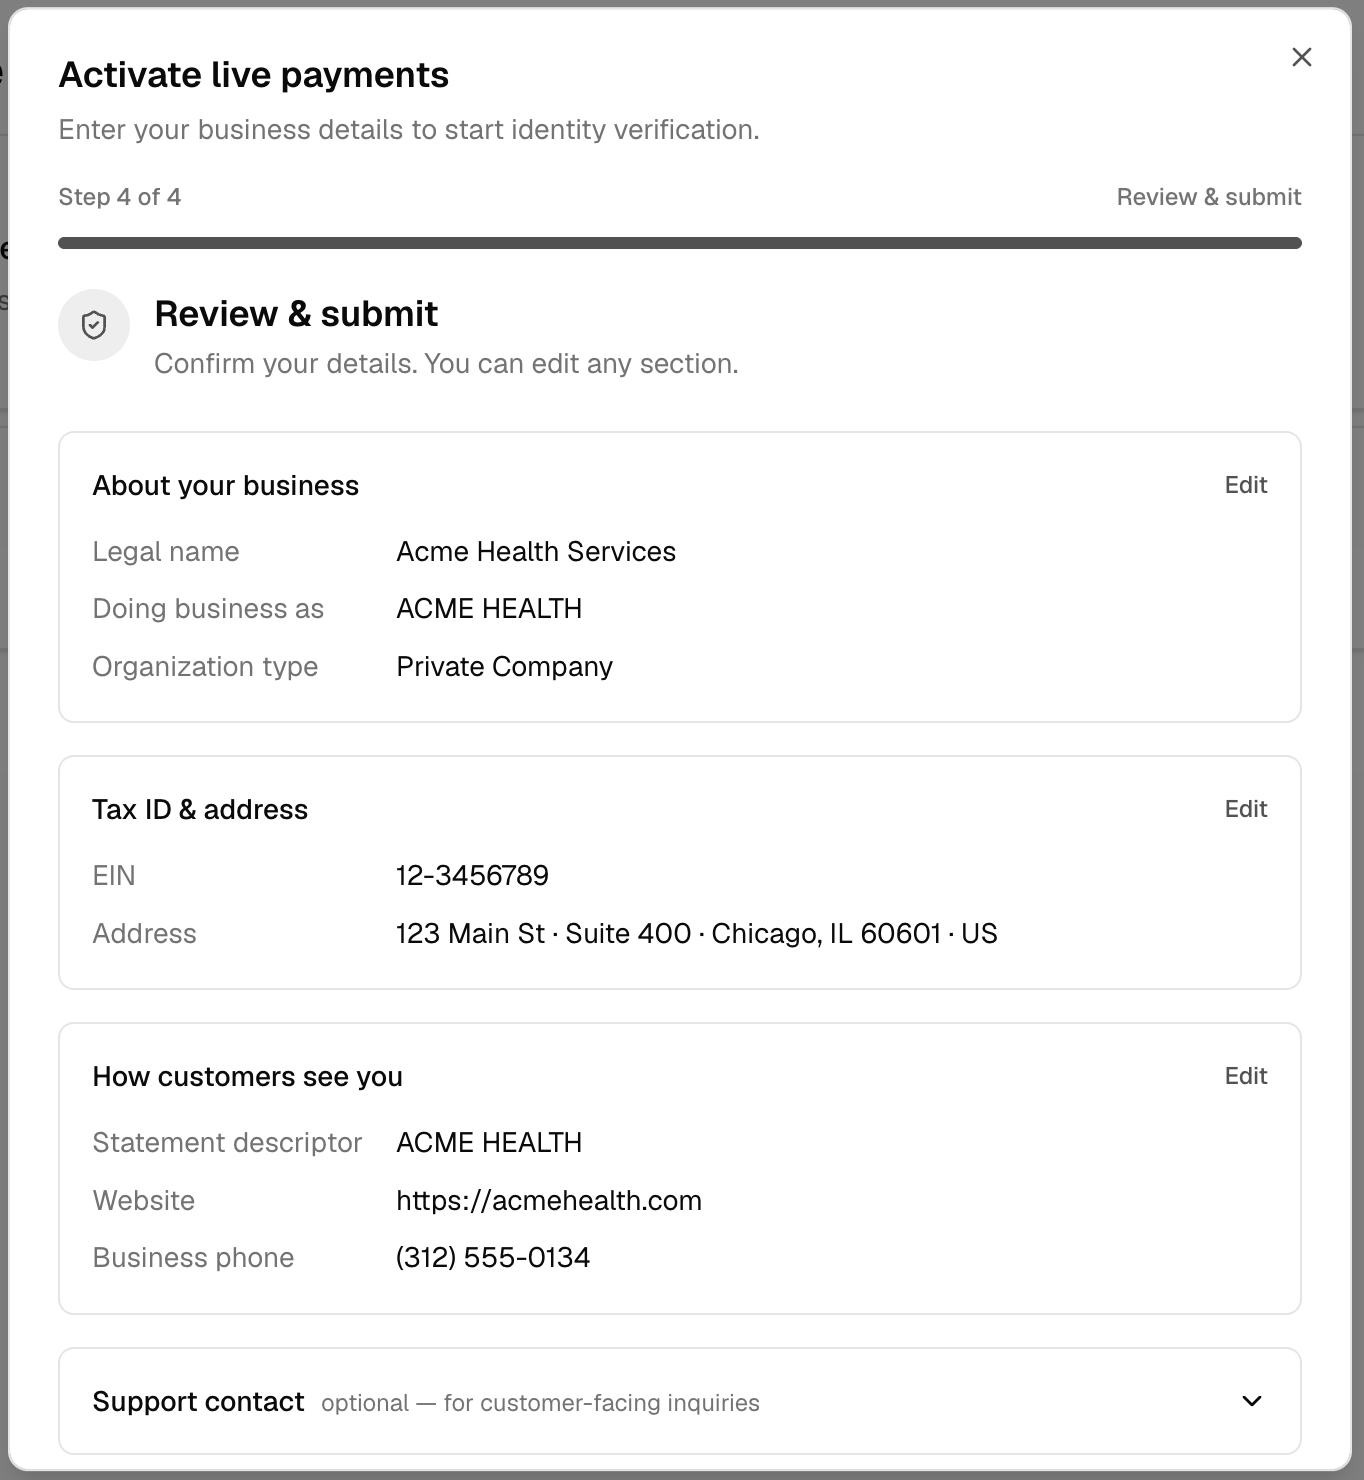 The review screen groups your entries into three sections:
Legal name, doing business as, and organization type.
Your EIN and full registered address, shown on one line.
Statement descriptor, website, and business phone.
Select **Edit** beside any section to jump back and correct it. You'll return to the review screen afterward.
Expand **Support contact** at the bottom to optionally add a customer-facing support email or phone number. We'll surface it to shoppers who have questions about a charge — worth filling in, even though it's optional.
Once everything is correct, submit the form.
***
## Step 5: Generate your API key
Your API key is what connects your store or platform to Gale. Nothing can be integrated until you've generated one.
In the dashboard sidebar, open **Developer Tools** → **API Keys**.
The button sits at the top right of the API Keys page.
Use something that identifies where the key will be used — for example `My App Integration` or `Shopify store`. Then select **Generate Key**.
Use the copy icon beside the key, then select **I've copied the Key**.
**The key is shown only once.** Once you close the dialog, it can never be displayed again — the API Keys table only ever shows a truncated version. If you lose it, revoke the key and generate a new one.
### Test keys vs live keys
Keys belong to the mode you're in when you generate them, and the table only lists keys for the mode you're currently viewing.
| Test Mode | Key you get | Environment | Use it for |
| --------- | ------------ | ----------- | ----------------------------------------- |
| On | `glm_test_…` | Sandbox | Development and testing. No real charges. |
| Off | `glm_live_…` | Production | Real orders and live payments. |
Live keys can only be generated once verification is complete. If you switch out of test mode before then, the dashboard prompts you to finish onboarding first.
### Store it safely
Keep the key in a password manager or your platform's secrets store, and pass it to whoever is doing your integration through a secure channel — not email or chat.
Never put an API key in client-side code or a public repository. If a key is exposed, open the **⋮** menu beside it and select **Revoke Key**, then generate a replacement.
Revoking a key immediately breaks every integration using it. Generate and swap in the replacement first.
Developers integrating with Gale can find full usage details in [Authentication](/developer-manual/authentication).
***
## What happens next
Once you submit your business details, you'll be redirected to complete payment onboarding.
If anything can't be matched automatically, or if anything is not correct you will be able to see it on Dashboard page with a button to update information.
Once verification is completed, All the action items form main dashboard page will disappear and your account will be ready for production.
You're fully set up when test mode is off, the verification banner is gone, and you've generated and safely stored an API key.
***
## Troubleshooting
Contact support before doing anything else. A duplicate account isn't linked to your invitation, and any details you entered there won't carry over to your real merchant account.
The banner clears once verification completes. If you've submitted and it's still an action item please click on action item on main dashboard page to update required information.
Keys can't be recovered — the full value is only ever shown at the moment you generate it. Open **Developer Tools** → **API Keys**, revoke the key you lost, and generate a new one. Remember to update any integration that was using the old key.
Check you're using the key that matches the environment you're calling. A `glm_test_` key only works against sandbox, and a `glm_live_` key only works against production — using one in place of the other returns `401 Unauthorized`. Also confirm the key still shows as **Active** in the API Keys table.
Live keys require completed verification. If the dashboard prompts you to finish onboarding when you switch out of test mode, verification is still outstanding — generate a test key for now and come back once it clears.
It sits in the top bar of the dashboard, to the left of the search field.
The review screen groups your entries into three sections:
Legal name, doing business as, and organization type.
Your EIN and full registered address, shown on one line.
Statement descriptor, website, and business phone.
Select **Edit** beside any section to jump back and correct it. You'll return to the review screen afterward.
Expand **Support contact** at the bottom to optionally add a customer-facing support email or phone number. We'll surface it to shoppers who have questions about a charge — worth filling in, even though it's optional.
Once everything is correct, submit the form.
***
## Step 5: Generate your API key
Your API key is what connects your store or platform to Gale. Nothing can be integrated until you've generated one.
In the dashboard sidebar, open **Developer Tools** → **API Keys**.
The button sits at the top right of the API Keys page.
Use something that identifies where the key will be used — for example `My App Integration` or `Shopify store`. Then select **Generate Key**.
Use the copy icon beside the key, then select **I've copied the Key**.
**The key is shown only once.** Once you close the dialog, it can never be displayed again — the API Keys table only ever shows a truncated version. If you lose it, revoke the key and generate a new one.
### Test keys vs live keys
Keys belong to the mode you're in when you generate them, and the table only lists keys for the mode you're currently viewing.
| Test Mode | Key you get | Environment | Use it for |
| --------- | ------------ | ----------- | ----------------------------------------- |
| On | `glm_test_…` | Sandbox | Development and testing. No real charges. |
| Off | `glm_live_…` | Production | Real orders and live payments. |
Live keys can only be generated once verification is complete. If you switch out of test mode before then, the dashboard prompts you to finish onboarding first.
### Store it safely
Keep the key in a password manager or your platform's secrets store, and pass it to whoever is doing your integration through a secure channel — not email or chat.
Never put an API key in client-side code or a public repository. If a key is exposed, open the **⋮** menu beside it and select **Revoke Key**, then generate a replacement.
Revoking a key immediately breaks every integration using it. Generate and swap in the replacement first.
Developers integrating with Gale can find full usage details in [Authentication](/developer-manual/authentication).
***
## What happens next
Once you submit your business details, you'll be redirected to complete payment onboarding.
If anything can't be matched automatically, or if anything is not correct you will be able to see it on Dashboard page with a button to update information.
Once verification is completed, All the action items form main dashboard page will disappear and your account will be ready for production.
You're fully set up when test mode is off, the verification banner is gone, and you've generated and safely stored an API key.
***
## Troubleshooting
Contact support before doing anything else. A duplicate account isn't linked to your invitation, and any details you entered there won't carry over to your real merchant account.
The banner clears once verification completes. If you've submitted and it's still an action item please click on action item on main dashboard page to update required information.
Keys can't be recovered — the full value is only ever shown at the moment you generate it. Open **Developer Tools** → **API Keys**, revoke the key you lost, and generate a new one. Remember to update any integration that was using the old key.
Check you're using the key that matches the environment you're calling. A `glm_test_` key only works against sandbox, and a `glm_live_` key only works against production — using one in place of the other returns `401 Unauthorized`. Also confirm the key still shows as **Active** in the API Keys table.
Live keys require completed verification. If the dashboard prompts you to finish onboarding when you switch out of test mode, verification is still outstanding — generate a test key for now and come back once it clears.
It sits in the top bar of the dashboard, to the left of the search field.
 ***
## Next steps
With your account verified and an API key in hand, connect your store to Gale.
Shopify, WooCommerce, BigCommerce, or a custom build.
How to use your API key, plus idempotency and security practices.
***
## Next steps
With your account verified and an API key in hand, connect your store to Gale.
Shopify, WooCommerce, BigCommerce, or a custom build.
How to use your API key, plus idempotency and security practices.