> ## Documentation Index
> Fetch the complete documentation index at: https://docs.withgale.com/llms.txt
> Use this file to discover all available pages before exploring further.
# Gale on Stripe
> The page in your Gale dashboard where you connect your Stripe account, import your catalogue, and keep the two in step.
**Gale on Stripe** is where the values you collected in Stripe become a working
connection. It lives in your Gale dashboard under **Integrations → Gale on
Stripe**, and it does four things: stores your credentials, checks them against
Stripe, imports your catalogue, and keeps the two sides in step afterward.
Everything on this page is **per mode**. Switch between sandbox and production
with the environment toggle in the dashboard — test and live hold separate
credentials, and neither can see the other's.
You also need a `cpmt_…` custom payment method type id, which you create on
your own integration path: [Stripe Payment
Elements](/custom-payment-methods/elements-payment-intent#step-1-create-your-custom-payment-method)
or [Stripe
Checkout](/custom-payment-methods/elements-checkout-session#step-1-create-your-custom-payment-method).
## Connect
Three fields, and only the first is mandatory.
| Field | What to paste | Required |
| --------------------------------- | ----------------------------------------------------------------------------------------------- | --------------------- |
| **Restricted API key** | The `rk_…` Stripe showed you once | Yes |
| **Custom payment method type ID** | The `cpmt_…` from the method you created | To finish setup |
| **Signing secret** | The `whsec_…` from the **SOPI (cpmt\_…)** event destination Stripe created for your adapter URL | Checkout Session path |
Gale verifies the key with Stripe the moment you save, so a wrong key or a
missing permission surfaces immediately rather than at a shopper's first
payment.
**Leave a field blank to keep what is stored.** Rotating just your API key does
not mean re-entering the signing secret — and it could not, because Stripe
reveals that secret only once. Blank means *unchanged*, never *cleared*.
### Create the restricted key
The key is the one value you must have. It is what lets Gale read your checkout
sessions and products and record payment outcomes back to Stripe. Create it once
per Stripe account, per mode.
A restricted key is not your secret key. It is scoped to exactly the permissions you tick below, and it cannot be used to move money.
In the Stripe Dashboard, open **Developers** and choose **API keys**.
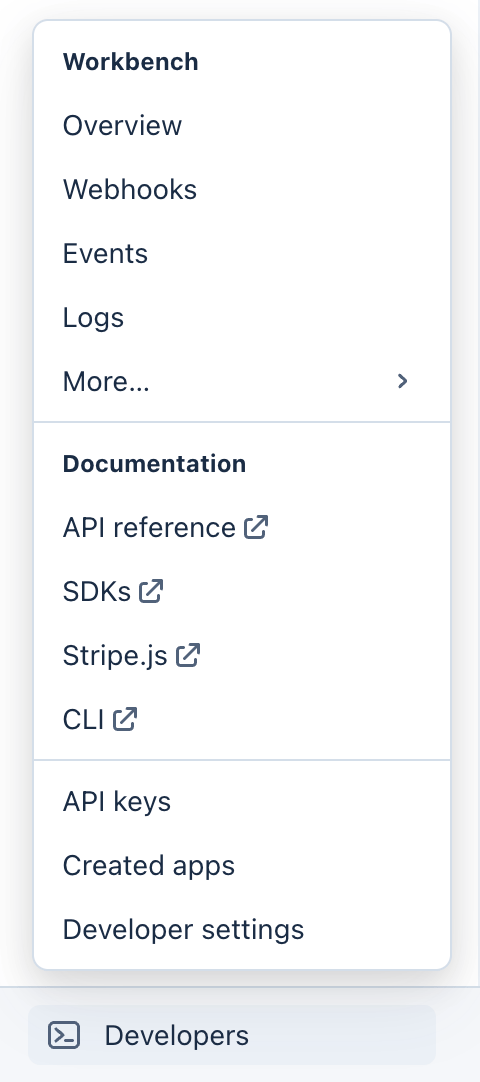 Find the **Restricted keys** card and click **Create restricted key**. Not the
standard secret key above it — that one can move money, and Gale neither needs
nor wants it.
Find the **Restricted keys** card and click **Create restricted key**. Not the
standard secret key above it — that one can move money, and Gale neither needs
nor wants it.
 Pick **Powering an integration you built** and click **Continue**. That is the
option that takes you to the full permission list, which is what you need.
Pick **Powering an integration you built** and click **Continue**. That is the
option that takes you to the full permission list, which is what you need.
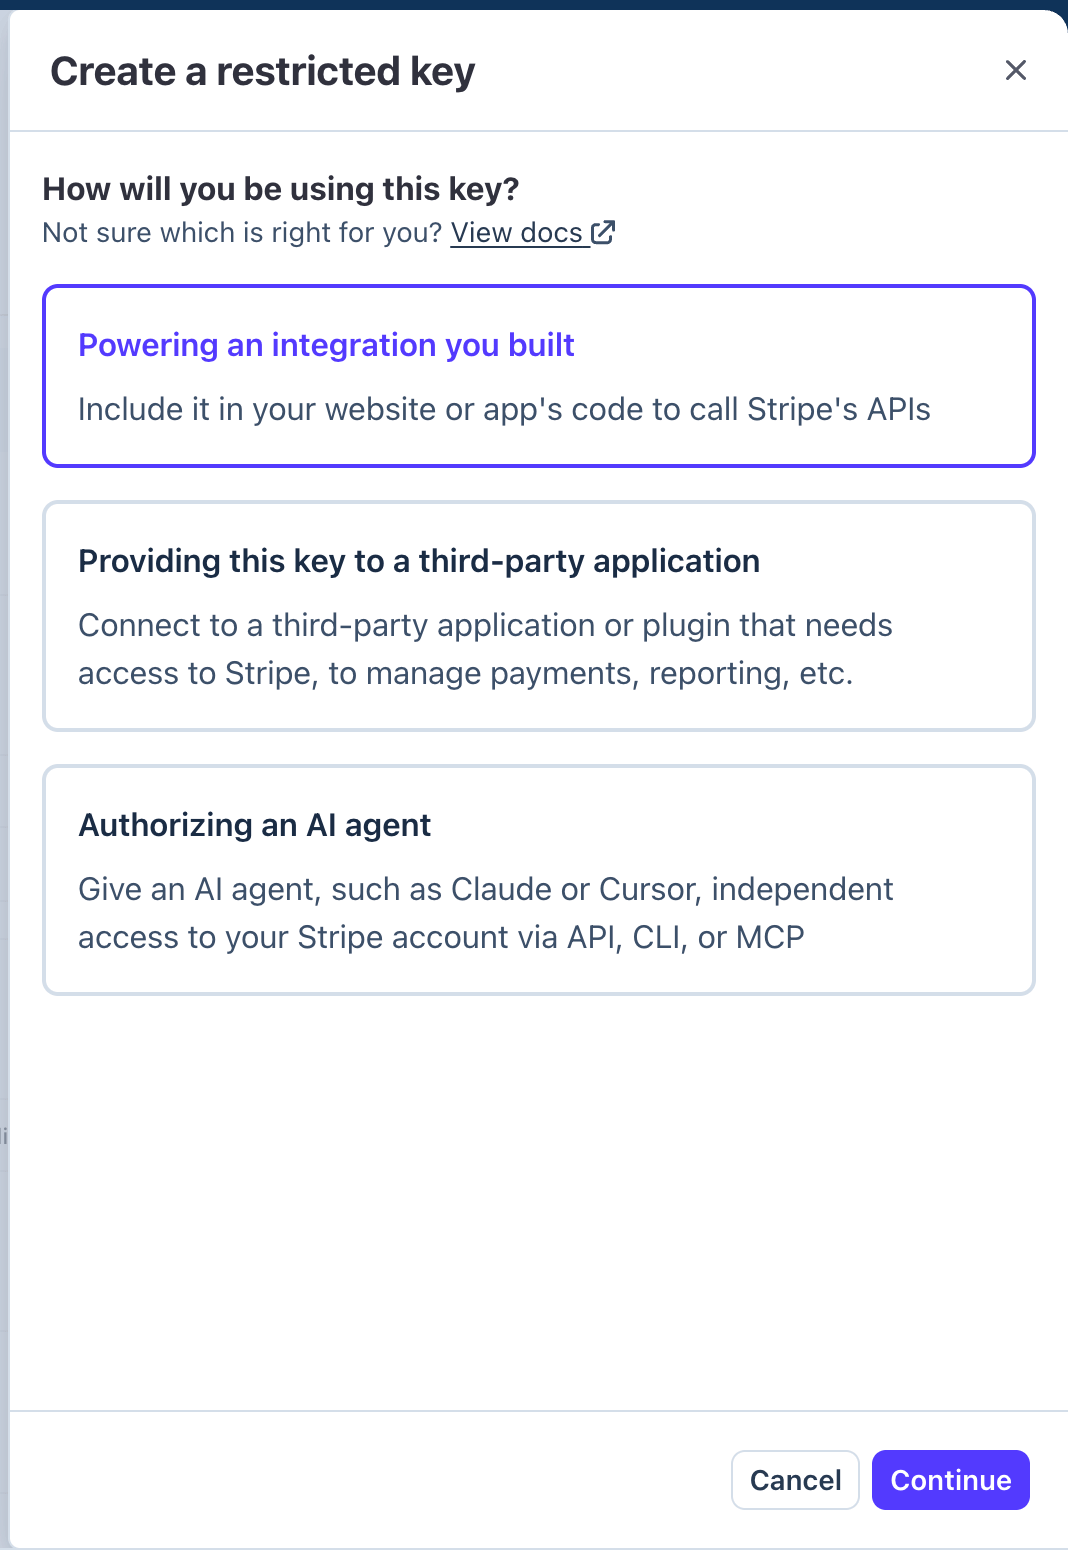 "Providing this key to a third-party application" sounds like the right
description of handing a key to Gale, but it leads to a different flow.
Use the first option.
You land on the resource list — everything set to **None**, grouped into
sections like **Core** and **Billing**.
"Providing this key to a third-party application" sounds like the right
description of handing a key to Gale, but it leads to a different flow.
Use the first option.
You land on the resource list — everything set to **None**, grouped into
sections like **Core** and **Billing**.
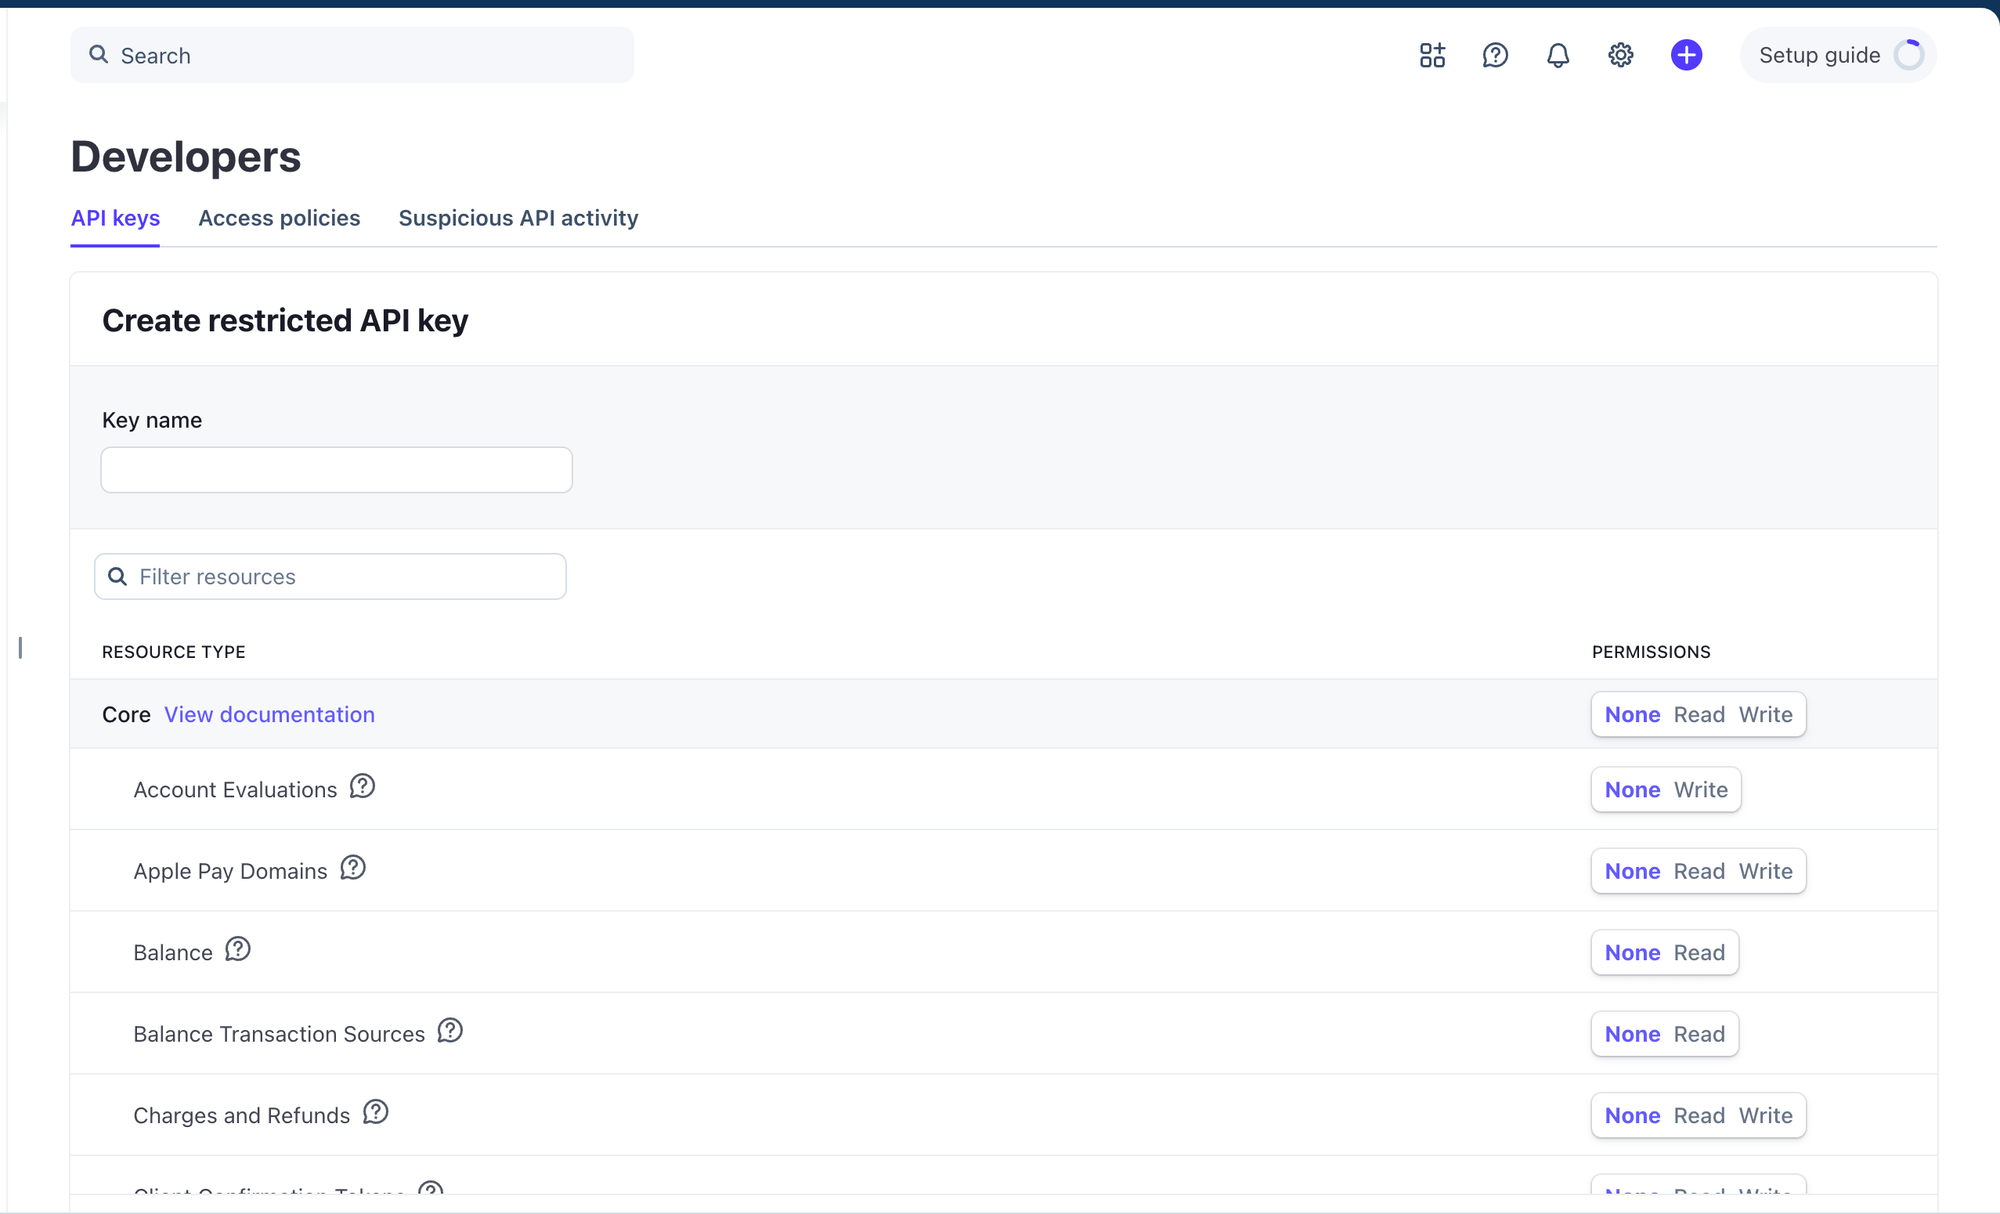 Use the filter box, then set each resource to the level in the table below.
| Search for | Set it to | What it is for |
| ------------------------------------- | --------- | ------------------------------------------------------- |
| Checkout Sessions | Read | Reading the session a shopper is paying for |
| Products | Read | Importing your catalogue |
| Prices | Read | Importing your catalogue — **and plans**, see below |
| Payment Records | Write | Recording payment outcomes back to Stripe |
| Payment Methods | Write | Attaching the payment method to the record |
| Subscriptions | Read | Keeping a subscription in step when you change its plan |
| Webhook Endpoints, Event Destinations | Write | Letting Gale register the endpoint it listens on |
**Write includes Read.** Where the table says Write, you do not also need to
set Read — Stripe grants it with the write level. That is why Payment
Records is one setting here even though Gale uses both.
There is no separate **Plans** resource — the legacy Plan API is served by
**Prices**, so setting that one covers both.
Use the filter box, then set each resource to the level in the table below.
| Search for | Set it to | What it is for |
| ------------------------------------- | --------- | ------------------------------------------------------- |
| Checkout Sessions | Read | Reading the session a shopper is paying for |
| Products | Read | Importing your catalogue |
| Prices | Read | Importing your catalogue — **and plans**, see below |
| Payment Records | Write | Recording payment outcomes back to Stripe |
| Payment Methods | Write | Attaching the payment method to the record |
| Subscriptions | Read | Keeping a subscription in step when you change its plan |
| Webhook Endpoints, Event Destinations | Write | Letting Gale register the endpoint it listens on |
**Write includes Read.** Where the table says Write, you do not also need to
set Read — Stripe grants it with the write level. That is why Payment
Records is one setting here even though Gale uses both.
There is no separate **Plans** resource — the legacy Plan API is served by
**Prices**, so setting that one covers both.
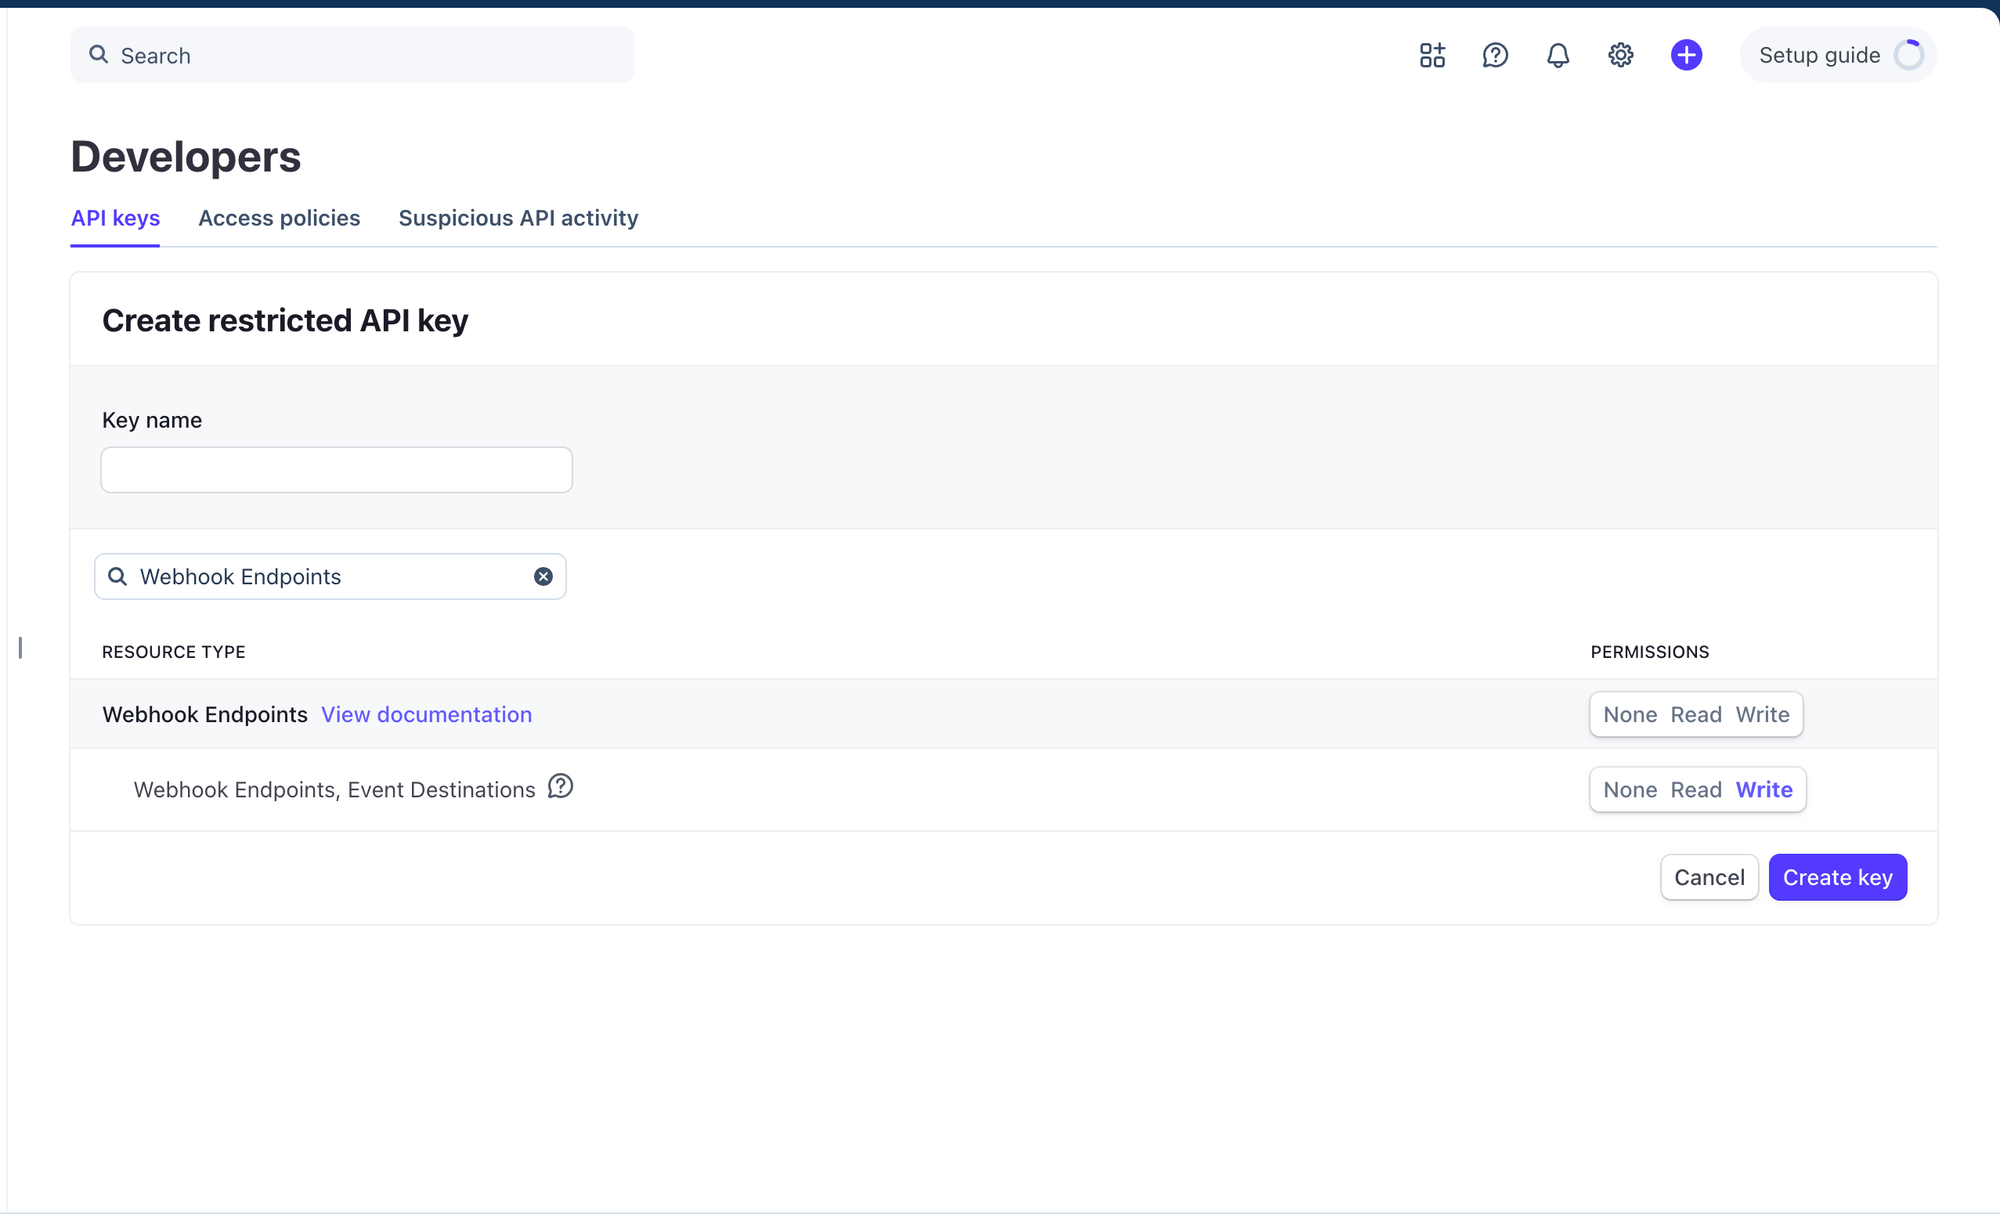 Set the level on the **child row**, not the section header. A search
usually returns the section — **Core**, **Billing**, **Webhook Endpoints**
— above the resource itself, and setting the section grants far more than
Gale needs.
Watch the last row especially: searching *Webhook Endpoints* returns a
**Webhook Endpoints** header and a child called **Webhook Endpoints, Event
Destinations**. The child is the one to set.
**Subscriptions** and **Webhook Endpoints** are only needed if you sell
subscriptions, or want product edits in Stripe to reach Gale on their own. A
key without them still takes payments perfectly well.
Give the key a name that will still make sense in a year — `Gale HSA/FSA`
works well — then click **Create key** and copy what Stripe shows you.
Stripe reveals a restricted key **once**. If you navigate away before
copying it, create another — it cannot be shown again. The same is true of
the permissions: they cannot be edited after the key exists, so a missed one
means a new key.
Paste it into **Restricted API key** above, then save.
### Reading the connection panel
After saving, the panel below the form reports what Gale actually knows:
* **A tick or a cross per permission** — taken from a live check against Stripe,
not from what you intended to grant. A cross names the row to go and set, using
the same name Stripe's key builder uses, so you can search for it directly. The
full list is in [Create the restricted key](#create-the-restricted-key) above.
* **Signing secret: set / not set** — whether, never what. The value is never
sent back to your browser, and there is no fragment of it worth showing.
* **Last verified** — when that check last ran. **Re-check permissions** runs it
again, which is the only way to refresh it: Stripe will not show you a
restricted key twice, so re-saving is not an option.
Two messages mean setup is genuinely incomplete rather than broken:
Your key is stored, but on the Checkout Session path Stripe signs every call
it makes to Gale. Without the secret, Gale cannot tell a real payment from a
forged one, so it turns all of them away. Every payment will fail until this
is pasted in.
On the Stripe Payment Elements path there is nothing to sign, and this does
not apply.
Your key and secret are stored, but Gale has no `cpmt_` id. Nothing is being
rejected — there is simply no custom payment method in Stripe for a shopper
to choose yet. Create it, then paste the id here.
## Connect your checkout
Once the connection is complete, the page shows the two things you wire up
outside Gale.
**Adapter URL** — the URL Stripe calls to start each payment. You paste this
into the *Checkout Sessions* endpoint field on your custom payment method.
If you are still creating the custom payment method, you need this URL
**before** you can finish — pasting it is the step that produces the `cpmt_`
id and the signing secret. Gale gives it to you during onboarding; ask your
Gale contact rather than waiting for it to appear here.
**Your webhook URL** — where Gale tells your own application what happened to a
payment. Set it under **Webhooks** in your Gale dashboard.
### Which webhooks you actually get
This catches people out, because the answer depends on which path you built:
**Both paths need a Gale webhook URL.** What differs is which events arrive
where.
| Your integration | Who tells you a payment happened |
| --------------------------- | ----------------------------------------------------------------------------------------------------- |
| **Stripe Payment Elements** | **Gale only.** Stripe is never in the payment path, so it sends nothing at all. |
| **Stripe Checkout** | **Both.** Stripe reports the session and the renewals; Gale reports settlement, refunds and disputes. |
Two silent failures this prevents, in both directions.
Build the Payment Elements path and wait on Stripe events, and you wait
forever — nothing fires there.
Build the Stripe Checkout path and assume Stripe covers you, and you lose the
three things it cannot tell you: **settlement** — Stripe knows the shopper
finished, not that the money moved — plus **refunds** and **disputes**. Gale
settled the charge, so there is no Stripe charge for those to attach to, and
there never will be.
Which events to subscribe to, and what each one means, is on your path's page:
[Stripe Payment
Elements](/custom-payment-methods/elements-payment-intent#step-4-set-your-gale-webhook-url)
· [Stripe
Checkout](/custom-payment-methods/elements-checkout-session#step-4-set-your-gale-webhook-url).
## Import products
Gale needs your catalogue to know what a shopper is buying and whether it is
HSA/FSA eligible.
* **Preview** shows exactly what would change and writes nothing.
* **Import** applies it.
The report afterward lists what needed your attention. A product with **no
price** is imported but left inactive, so fix it in Stripe and run again. A
product with **no SKU tag** is imported and active — Gale keys it on the Stripe
product id instead — and is listed only so you can tag it if you would rather it
matched your own identifier. Importing twice is safe; it updates rather than
duplicates.
### Keep products in sync
A switch on the same card. Turn it on and a product you create, edit or archive
in Stripe reaches Gale on its own, with no re-import.
Archiving is the common case, not deleting. Stripe will not let you delete a
price that has ever been used — you set it inactive instead — and Gale treats
that as archived, exactly as the manual import does.
If the switch is on but nothing seems to arrive, the page will say why. The
usual cause is a restricted key without **Webhook Endpoints → Write**: Gale could
not register the endpoint it listens on, so it shows you Stripe's own error. Add
the permission, create a new key, and paste it in.
Subscription changes — a plan swap, a cancellation — are **never** part of this
switch. They are core to keeping billing correct, so Gale always listens for
them. The switch only governs your product catalogue.
## Troubleshooting
Two usual causes.
Restricted key permissions cannot be edited after creation — if you ticked
the box after creating the key, that key does not carry it. Create a new key
with the full set and paste it in.
Or the level landed on the wrong row: Stripe groups resources under section
headers like **Core** and **Billing**, and setting the header rather than the
child row does not grant the child. Check the row itself.
The page shows it only once all four hold: key accepted, every permission
granted, signing secret stored, `cpmt_` id present. If you are mid-setup and
need the URL to continue, get it from your Gale contact.
That is expected. The two modes hold separate credentials — a full set has to
be created in Stripe for each, and a test `cpmt_` id shipped in a live
checkout is the most common reason Gale never appears in production.
Subscription sync needs **Subscriptions → Read** and **Webhook Endpoints →
Write** on the restricted key. Payments do not, which is why this fails
quietly while everything else looks healthy. Check the connection panel for
Stripe's error.
## Related
* [Custom Payment Methods overview](/custom-payment-methods/overview) — which integration path to pick
* [Stripe Checkout](/custom-payment-methods/elements-checkout-session)
* [Stripe Payment Elements](/custom-payment-methods/elements-payment-intent)
Set the level on the **child row**, not the section header. A search
usually returns the section — **Core**, **Billing**, **Webhook Endpoints**
— above the resource itself, and setting the section grants far more than
Gale needs.
Watch the last row especially: searching *Webhook Endpoints* returns a
**Webhook Endpoints** header and a child called **Webhook Endpoints, Event
Destinations**. The child is the one to set.
**Subscriptions** and **Webhook Endpoints** are only needed if you sell
subscriptions, or want product edits in Stripe to reach Gale on their own. A
key without them still takes payments perfectly well.
Give the key a name that will still make sense in a year — `Gale HSA/FSA`
works well — then click **Create key** and copy what Stripe shows you.
Stripe reveals a restricted key **once**. If you navigate away before
copying it, create another — it cannot be shown again. The same is true of
the permissions: they cannot be edited after the key exists, so a missed one
means a new key.
Paste it into **Restricted API key** above, then save.
### Reading the connection panel
After saving, the panel below the form reports what Gale actually knows:
* **A tick or a cross per permission** — taken from a live check against Stripe,
not from what you intended to grant. A cross names the row to go and set, using
the same name Stripe's key builder uses, so you can search for it directly. The
full list is in [Create the restricted key](#create-the-restricted-key) above.
* **Signing secret: set / not set** — whether, never what. The value is never
sent back to your browser, and there is no fragment of it worth showing.
* **Last verified** — when that check last ran. **Re-check permissions** runs it
again, which is the only way to refresh it: Stripe will not show you a
restricted key twice, so re-saving is not an option.
Two messages mean setup is genuinely incomplete rather than broken:
Your key is stored, but on the Checkout Session path Stripe signs every call
it makes to Gale. Without the secret, Gale cannot tell a real payment from a
forged one, so it turns all of them away. Every payment will fail until this
is pasted in.
On the Stripe Payment Elements path there is nothing to sign, and this does
not apply.
Your key and secret are stored, but Gale has no `cpmt_` id. Nothing is being
rejected — there is simply no custom payment method in Stripe for a shopper
to choose yet. Create it, then paste the id here.
## Connect your checkout
Once the connection is complete, the page shows the two things you wire up
outside Gale.
**Adapter URL** — the URL Stripe calls to start each payment. You paste this
into the *Checkout Sessions* endpoint field on your custom payment method.
If you are still creating the custom payment method, you need this URL
**before** you can finish — pasting it is the step that produces the `cpmt_`
id and the signing secret. Gale gives it to you during onboarding; ask your
Gale contact rather than waiting for it to appear here.
**Your webhook URL** — where Gale tells your own application what happened to a
payment. Set it under **Webhooks** in your Gale dashboard.
### Which webhooks you actually get
This catches people out, because the answer depends on which path you built:
**Both paths need a Gale webhook URL.** What differs is which events arrive
where.
| Your integration | Who tells you a payment happened |
| --------------------------- | ----------------------------------------------------------------------------------------------------- |
| **Stripe Payment Elements** | **Gale only.** Stripe is never in the payment path, so it sends nothing at all. |
| **Stripe Checkout** | **Both.** Stripe reports the session and the renewals; Gale reports settlement, refunds and disputes. |
Two silent failures this prevents, in both directions.
Build the Payment Elements path and wait on Stripe events, and you wait
forever — nothing fires there.
Build the Stripe Checkout path and assume Stripe covers you, and you lose the
three things it cannot tell you: **settlement** — Stripe knows the shopper
finished, not that the money moved — plus **refunds** and **disputes**. Gale
settled the charge, so there is no Stripe charge for those to attach to, and
there never will be.
Which events to subscribe to, and what each one means, is on your path's page:
[Stripe Payment
Elements](/custom-payment-methods/elements-payment-intent#step-4-set-your-gale-webhook-url)
· [Stripe
Checkout](/custom-payment-methods/elements-checkout-session#step-4-set-your-gale-webhook-url).
## Import products
Gale needs your catalogue to know what a shopper is buying and whether it is
HSA/FSA eligible.
* **Preview** shows exactly what would change and writes nothing.
* **Import** applies it.
The report afterward lists what needed your attention. A product with **no
price** is imported but left inactive, so fix it in Stripe and run again. A
product with **no SKU tag** is imported and active — Gale keys it on the Stripe
product id instead — and is listed only so you can tag it if you would rather it
matched your own identifier. Importing twice is safe; it updates rather than
duplicates.
### Keep products in sync
A switch on the same card. Turn it on and a product you create, edit or archive
in Stripe reaches Gale on its own, with no re-import.
Archiving is the common case, not deleting. Stripe will not let you delete a
price that has ever been used — you set it inactive instead — and Gale treats
that as archived, exactly as the manual import does.
If the switch is on but nothing seems to arrive, the page will say why. The
usual cause is a restricted key without **Webhook Endpoints → Write**: Gale could
not register the endpoint it listens on, so it shows you Stripe's own error. Add
the permission, create a new key, and paste it in.
Subscription changes — a plan swap, a cancellation — are **never** part of this
switch. They are core to keeping billing correct, so Gale always listens for
them. The switch only governs your product catalogue.
## Troubleshooting
Two usual causes.
Restricted key permissions cannot be edited after creation — if you ticked
the box after creating the key, that key does not carry it. Create a new key
with the full set and paste it in.
Or the level landed on the wrong row: Stripe groups resources under section
headers like **Core** and **Billing**, and setting the header rather than the
child row does not grant the child. Check the row itself.
The page shows it only once all four hold: key accepted, every permission
granted, signing secret stored, `cpmt_` id present. If you are mid-setup and
need the URL to continue, get it from your Gale contact.
That is expected. The two modes hold separate credentials — a full set has to
be created in Stripe for each, and a test `cpmt_` id shipped in a live
checkout is the most common reason Gale never appears in production.
Subscription sync needs **Subscriptions → Read** and **Webhook Endpoints →
Write** on the restricted key. Payments do not, which is why this fails
quietly while everything else looks healthy. Check the connection panel for
Stripe's error.
## Related
* [Custom Payment Methods overview](/custom-payment-methods/overview) — which integration path to pick
* [Stripe Checkout](/custom-payment-methods/elements-checkout-session)
* [Stripe Payment Elements](/custom-payment-methods/elements-payment-intent)